You’ve launched your first product on Amazon and now you are ready to drive traffic to your ad. To do so, you’re going to need to run advertising. This tutorial will help you set up your first manually targeting campaign.
Prerequisites
To start off, you should have a keyword list of relevant terms for your product. If you don’t have this list, you can use Amazon’s suggested keywords or you will have to create an automatic campaign and let Amazon choose these words based on how the algorithm sees your product. This tutorial will be an overview of how to create a manual campaign. Let's get started!
Getting started
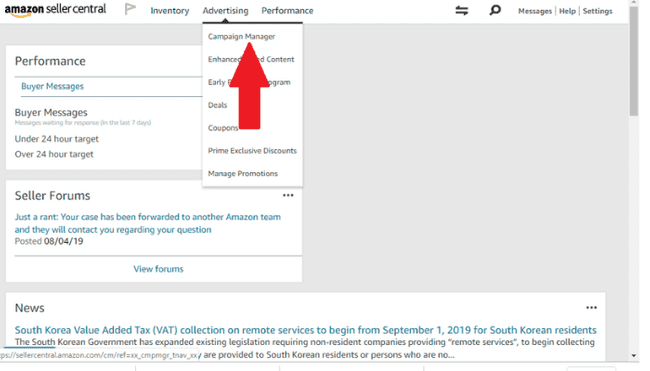
To start your first campaign you will need to first log into your Seller Central account and click on the advertising tab.
Next scroll down and click on campaign manager and then click “create campaign”.
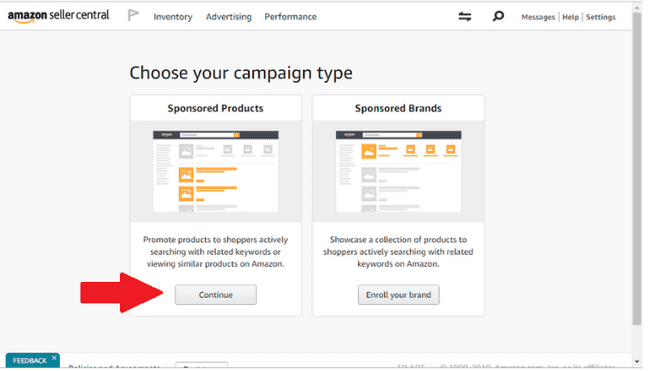
You will be asked what type of campaign you would like to create. For your first campaign, and for this tutorial we will be working with Sponsored Products. Click on the “continue” button under Sponsored Products to take you to the next step.
Choose your Campaign type
Now we are into the creation portion of the campaign. First step is to give your campaign a name. Try and be specific with the title (label it with the match type or goal, something to give you an overview of the campaign without having to click into it). Next you can go down to the daily budget. You don’t need to add a portfolio as this is to organize campaigns once you have several created. You can also skip over the start and finish date, unless you have a future date or end time you want to add. For my personal campaigns I have the start date as today’s date and the end date left open.
Set your daily budget
You need to add a daily budget. This is what you will allow Amazon to spend per day. As a personal recommendation, you should be in the $20 - $30 range. I chose these numbers for 2 reasons. One, it’s not excessively high and if a certain keyword gets several clicks in one day, it won’t kill you financially. Secondly, its high enough to get some data back. The algorithm favors higher budgets as it shows Amazon “you are here to play”.
Once we have a daily budget in place you will need to select the type of campaign you want to create, automatic or manual. For the sake of this tutorial, we will be creating a manual campaign as there are more steps. For the automatic campaign, it is very straightforward as Amazon will be doing the work for you. Remember, you have less control with the automatic campaign so approach with caution. Click the manual campaign bubble to move to the next step.
Give it a title
The next step is giving the Ad Group a title. Again, be specific as you can to create more than one ad group and it will save you time in the future. If you don’t know exactly what to put, that's alright as you can come back and edit later. If you don’t know what an ad group is, read the previous blog post as we go into depth on the subject.
Now that we have our ad group, we can add a product to target. If you have more than one product that you would like to advertise, then they should all have their own campaigns. It's alright to advertise variations together, but not completely different products as they will have different keywords and convert differently. Add your product by clicking the “Add” button. If you want to advertise variations as well, click the “add variations” button. This will populate your product into the right-hand column which signifies it will be targeted with your ads.
About choosing bids
Place the maximum you are willing to bid on a keyword in the default bid box. Amazon will give you a suggested bid along with the minimum and maximum prices for these bids. In general, the higher the bid the better location of your ad (first page instead of on a product page). However, there are a few other metrics that go into placement, such as conversion rate, reviews etc. I recommend starting with slightly above the recommended bid and monitoring this as you go. You may have to raise the bid if you aren't getting impressions, or lower it if it is spending too much. Again, you can come back and edit this at any time. Below this, you will see a link for bid+. This is an advanced tactic that I don’t recommend until you have lots of quality data on what’s converting for your product.
Add keywords
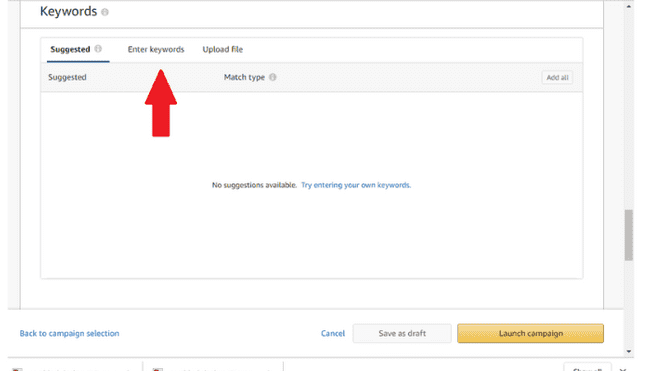
Next, we have the heart of the campaign, the keywords. You have three options here: suggested, enter your own, or upload a file. If you don’t have a keyword list you can use Amazon’s suggestions. Otherwise, you can click “enter keyword” and add them from your list. Once you click on “enter keyword” a box will appear with a space to enter your keyword, as well as a drop-down menu to choose the match type. If you don’t know about match types check out the last blog post. Fill your keywords into the box, categorized by the match type. Once you have typed the keyword, click “Add keyword” on the bottom right corner of the box. Once you have added the keywords, and they have been populated in the box below, you can look over the suggested bids and see that the bid price you set earlier is relevant. You can change them as needed here if you need to raise or lower the bid, this can also be done once the campaign is active.
Launch!
At this point, you are ready to start your campaign. There’s one more box for negative keywords, but unless you have previous data you won’t know what to place in this box. This is where you can add certain seed keywords that will become negatives for your ad group. This is good if you are selling a black foam roller and notice after gathering some data that the broad match search term “foam roller” keeps getting clicks for “pink foam roller”. You notice after time that the search term report shows that you are not getting any sales when its shown for “pink foam roller”. However, the broad match search term foam roller is very profitable for several other long-tail keywords. At this point you could add pink with the match type negative phrase to keep it from showing. If this is your first campaign you will most likely need to gather data first before adding negative terms.
Your final step is to click “launch campaign”. Your ad may take an hour or two to become active but it will start to run shortly. Amazon’s reporting for PPC is extremely slow and can be delayed by up to 2 days. So if you’re showing no sales or low impressions in the first couple of days remember it could just be behind.
It's an investment
It may be scary and you will probably spend more than you want for the first couple of weeks. But like any business, some initial investment is needed for long-term profitability.
Back To Overview

